Dollar Store Flower Craft

Today was Mommy and Hey day. After the princess treatment at the nail salon, we made a trip to the Dollar Store, our 2nd favorite place to go get craft supplies. I am getting better at envisioning what I can do with things for art.  I don't always need to resort to Pinterest or Google. Now I don't know how original of an idea it is, but it it new to me.
I bought self-stick flags to create pretty flowers. Great thing about this craft is that it is very self explanatory. It is super easy for any child to create beautiful art. This flower craft fed my kids need to craft without the mess or fuss.
easy dollar store preschool flower craft
Flower Craft with self-stick flags.

Dollar store flower craft
Great craft supply from the Dollar Store.

flower craft supplies
Supplies I made available for flower craft creations.
We used Creatology Foam Stickers 'Shapes' to create the centers of the flowers. We cut up a few of the triangles to create the stems for the flowers.
simple self-stick flag dollar store flower craft
Self-stick flags made into a simple flower craft.
With easy crafts like this, my girls will do several before they get bored with it. I love it when something so inexpensive can be used to create art. You cannot beat art inspired by a $1 purchase. My girls added their own touch to their creations.

Myrrh added a pig.

A pig added in with the flower blossoms.
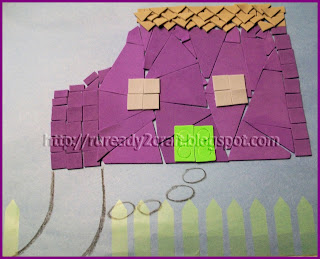
Hey created a cottage with a picket fence. You can make more things with the self-stick flags, a picket fence, what a great idea!

dollar store self-stick flag craft
Summer cottage with a 'white' picket fence.
What could you make with the self-stick flags?


How NOT to make Korker Bows - Craft Fail

It is getting to be quite a sizzling summer. Yesterday was 105 degrees. Since NASA is still unemployed we have to try everyway we can to cut back. That means a much warmer house with less use of the A/C.  With a 2 story house on just 1 unit it is tough. It just means using the oven as little as possible to help keep the house cooler. Well, you have to use the oven to make good korker bows. So I was thinking.... think, think, think. Then, Pooh, I had an idea.

korker bow craft
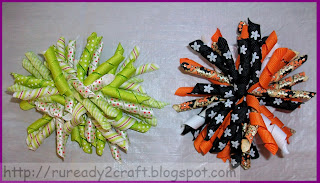
My favorite korker bow creations before summer hit.
It is hot here. To make korker bows you need heat. Normally I put the ribbons in the oven for 20 minutes at 275 degrees. It may not be necessary to keep the oven that hot for that long.  So I wondered if I took the ribbons out into the hot sun would that 'bake' them enough?
Out in the sun all day to make korker bows.
So I wrapped my ribbon around my favorite korker ribbon makers, BBQ skewers. Then what everyone else uses, 1/4" wooden dowels. Wet them thoroughly to set on my old cookie sheet outside. I placed them outside in the part of our yard that gets sun 16 hours of the day. I put them on a teak end table thinking heat rises up from the walkway. I let them 'cook' there all day.
After a day in the sun, they were super dry, but were they curly?
I brought them inside out of the desert heat and sun at 8 PM. I chose two specimens to test. I felt like a hairdresser checking to see if a perm is done. Anywho, the results were less than I wanted, but still made them curly. They just weren't curly enough for my korker bows. Bummer.
The results are a little to loose for me.
Huge craft fail. I guess I will stick with my other bow making until it is cool enough to turn the oven on or if I feel like staying up past 1 AM or get up before 5 AM. I don't see that happening anytime soon. I am not that dedicated or driven for korker bows.

Right now I am into what I call my Gardenia bows. Look for that post soon.

Veritable Boredom Solution Bug Craft

Last week Hey and Myrrh were going each morning to Vacation Bible School, also known as Veritable Boredom Solution. An awesome inexpensive way to occupy my children during the summer. This one is 8:30 AM to noon. Granted it isn't the whole day, but for $15 per child (includes a t-shirt and snack) I think it is a great price for a 1/2 day camp. The theme was BugZone: Transformed by Our Big God. My girls like bugs as long as they aren't loose in the house. Well, you can put it in a box or plastic cup, that's different. I say, "No bugs in the house unless they are dead!"
Myrrh's Bug Headband Craft
Anywho, it has been a very nice week for us at VBS. They have come home each day with a Bug Zone themed activity book. There are cute bug related jokes too that the girls love. What does a bumble bee say when it flies backwards? Zub Zub. Anywho, they were doing a performance on stage. They wanted to have antennae like many of the VBS team leaders and helpers have been wearing each day. An easy craft project is born. I didn't look it up or watch a video! Figured I could just do it on the fly.


Supplies Needed:

Pipe Cleaners
Firm U shaped Headband
Glue
Optional: Pom Poms. FYI: I don't know of any arthropods that have balls on the end of their antenna. The girls didn't care, they liked the way they look.

Note to self: If you have pipe cleaners, pom poms and a glue gun on hand, you might be a crafter, just sayin'.

Making Bug Antennae Headband Craft
Ideally you will want to let the kids pick the headband, pipe cleaners and pom poms they want. They are more likely to wear their own creation.

1. Take a pipe cleaner and wrap it tightly around the top of the headband.

Suggestion: Be sure to start wrapping with the end on the top of the headband. This helps keep the pointy end of a pipe cleaner from poking your child's head.

2. With the 2nd pipe cleaner repeat # 1.

Suggestion: Wrap it the same amount of times, trying to make sure that both are the same length.

3. Place a dab of glue on the top of the pipe cleaner, the one furthest from the headband.

Suggestion: The hot glue gun came in handy and was fast. I have tried letting the kids use regular school glue, tacky clue, etc... for pom poms and pipe cleaners. It doesn't work well and can take forever to stick.

4. Squeeze the pom pom onto the tip top of the pipe cleaner. Hold it a few seconds until it feels secure.

5. Let the child to shape (re-shape) their antennae once the glue is dry, they are now good to go.

Optional: One of the headbands was slippery plastic. I hot glued either end and in between the antennae on the headband to keep it from sliding.

Optional Suggestion: You could use color coordinated rubber/hair bands on either end of the wrapped pipe cleaner for similar results, depends on how picky your child is about how it looks.

The girls were thrilled with their creation. It was a fun quick craft that they felt successful about and wore with pride.

Wearing their bug craft creations while enjoying VBS workbook.

Beary Special Card For Dad

At the last minute, I decided to pull together a Father's Day card that would be different from the "Love You... This Much" card that the girls Dad, NASA, watched them make for Papa. I originally planned to create some footprint art for his gift. I thought I would have the girls create a bear from their footprint inspired by one I saw on the blog Handprint & Footprint Art. It would say, "You are Beary Special." I know, super cute huh?

NASA takes the girls hiking and camping. They have come home telling me all about spotting bear scat. Oh joy! They thought a bear for his Father's Day card was awesome.

After doing the hands cut outs for the card they made Papa, I wasn't really in the mood to pull out the paint. I really should have planned better and done the Father's Day crafts on seperate sessions. I just didn't have the motivation and the girls didn't want to sit and wait, they wanted to keep working to finish all the crafts.  Since I already had the Cricut out for the "Love You," so I figured why not see about finding a bear.

The Doodlecharms Cricut cartridge has a teddy bear. I printed it out on brown card stock. The girls did the rest. Results: very adorable Happy Father's Day... You are Beary Special cards.

This beary special card could be used for any holiday.  Bears are never out of style.

Father's Day Craft - Love You...

This was a fun and easy craft for Hey and Myrrh. 10 Easy Steps. I saw this on Day in My Life blog and thought it was great for a Father's Day gift to send to Papa. Being that he is all the way across the country, this could be like a hug sent to him. Plus, I didn't really plan anything in advance and was able to do this on a whim since I had all the supplies on hand.

Materials List:
Card Stock Paper - Child's color choice
Pencil
Scissors
Eraser
Glue
Stickers and/or Stamps for the letters

Step 1.  Trace both hands onto colored card stock paper.


Step 2.  Cut the hands out of the card stock.


Step 3.  Erase the pencil marks from the hand after it is cut.

Step 4.  Write, stick, or glue the words "I Love You..." on one side of one hand. On card stock, I cut out the words with my Cricut using the Jubilee Celebration Font Cartridge. The girls glued it onto the hand.


Step 5.  Cut 2 strips of card stock paper, the same size/width. Ours were the length of the paper, 11 inches. The width of our strips were 1 1/2 inch. Your strips may vary depending on the size of your letters and/or your child's hand.  

Step 6.  Glue the two strips together, end to end, making it approx. 21 inches long since you have to overlap the ends to glue together. You can make it as long as you want.

Step 7.  Fold the long strip, accordion style.

Step 8.  Place a letter in each fold. "T h i s   M u c h".  Leave enough space at the ends to allow the strip to be attached to each hand and still show when extended out.


Step 9. Glue a hand at each end. Be sure that when folded together the "Love You..." can be on top of the accordion folded center paper showing the "This Much".


Step 10. On the back of the hand write whose hands they are and the year. We wrote: Handmade for you from Hey, Happy Father's Day 2012.

Lessons learned:
1. Do not use foam letters if you are sending this through the mail. It created a thick bulky card. Next time I will let the girls stamp letters, or use flat stickers.
2. I would pay attention to what direction the child glues the hands to the strip, so that folded all together the thumbs and fingers line up.

This actually would be a great card/gift for anyone for any holiday like a Birthday, Mother's Day or Valentine's Day.

Birthday Bow Holder Present

Continuing on my adventure into the DIY crafting world, I decided to make a bow holder. I have been busy making bows for my daughters and even created some as an inexpensive and unique birthday present for my daughter’s classmate. My newfound tolerance of crafting has turned into a new hobby and my very own blog about my adventures in the craft world. I got the idea to make bows, hairclips and a bow holder from a friend, Leah Mims, in Tucson, who has turned her hobby into a little business. She gave my daughters each a bow holder and bows at their Adoption Day party in April 2009. She has talent I can only aspire to.

My 1st crafts, A.D. (after dependents), were hair clips. I started by just covering hair clips with ribbon, getting used to using a hot glue gun, and attaching all the ribbon and non-slip grips. Another one of my friends, Amanda, is the one who told me about using the shelf liner as non-slip grips for hair clip. I use some purple shelf liner I found on clearance.
Still learning not 2 use so much glue.
Anywho, I thought I'd make the birthday girl a bow holder for all the hair clips I made for her. When I called to RSVP for the party, I found out from the birthday girl's Mom that her favorite color is purple. I chose a butterfly theme since most little girls like butterflies. Hence, why my current craft table cover has butterflies.

Supplies Needed:
  • wood plaque
  • wooden ‘smile’ - these would be fun as personalized name holders too!
  • large butterfly for the corner and/or other embellishments of choice
  • butterfly ribbon or ribbon complementary to your theme
  • acrylic paint
  • glitter paint - I found the purple one in the clearance section at Wal-Mart!
  • Optional: staple gun
  • Optional: I bought a purple brush and comb with holes on the end to hang from nails on the holder.
Did I mention that Michael’s has become my new favorite store?! I purchased most of the above supplies from there. It has become habit to always check the clearance aisle at Michael’s for frugal & fun finds. The dew drop stickers I used for the end of the nails were found there. They were marked 49 cents, but they rang up as 1 cent- Woo Hoo, gotta love a bargain!
How to make this Bow Holder:
  1. Paint the whole wood base the color of your choice as well as on the edges. Ours is a lilac color. Let that dry thoroughly.
  2. Paint the top with the purple glitter paint or another color of choice.
  3. Repeat with as many coats of the glitter paint needed in order to get an even color.
  4. Nail or hot glue the word on. We chose 'smile.' I did both because I wasn't sure how secure it would be with just glue.
  5. Glued 2 pieces of 10 inches of the butterfly ribbon together, back to back, so that the pattern was on both sides.
  6. With the ribbon, created a loop, like those 'awareness' ribbons and glued it to the back of the plaque.
  7. Cut three more pieces of ribbon to hang from the back of the plaque, approx. 2 ft. in length. Glued them to the back of the board with the pattern facing out.
  8. Optional: Once the glue for the ribbons on the back were dry, stapled the ribbons on the plaque. I wasn't going to let dried out glue ruin the holder months or years from now. 
  9. Optional: Printed out a 2 X 4 label that said, "Handmade for you from Hey May 2012" with my daughter's picture. I adhered it to the back.
  10. Optional: Measured equal distance from the ends and hammered two nails on the front of the plaque. Took dew drop stickers and adhered them to the nail heads.
  11. Adhere any embellishments you would like to decorate the plaque with.
  12. At the bottom of the 3 hanging ribbons I used the butterfly embellishments to weigh down the ends. 
There certainly should be plenty of room for bows! 
Additional Notes:
  • The one thing I would have changed was how I nailed the ‘smile’ to the plaque. I wanted it secure, but should have used finishing nails. I also should have placed the nails where they wouldn’t be so obvious. Each time I make one of these I am sure I will get better at it.
  • When I make hangers for bow holders in the future, I plan to use either a regular picture holder, two-sided ribbon, or solid colored ribbon; the ribbon I used only had print on one side. I ended up gluing two pieces together so the pattern would be on both sides. Since this wood was larger and heavier, I should have used a regular picture hanger. Next time around I will be better prepared!
  • I don’t think I would use such a large heavy piece of wood for the base next time unless I was prepared to do wooden dowels for hooks and use a picture hanger. I wanted to put a wooden butterfly on the base, but due to the size and shape couldn’t find a reasonable priced base for it. I didn’t want to spend a fortune. I have some ideas for my next bow holder that I think I will like better.
It was quite the adventure and learning experience. I learned there is a Hobby Lobby store opening in our town soon and am so excited to see what journey that store may bring!

In The Beginning

My husband and a good friend, Amanda, helped create my blog title. He suggested Passive Crafter, Disaster Crafter and decided that The Bow Master was the one, but I do more than bows. I also wouldn’t call me a ‘Master’ of any craft. Amanda, who I consider a Master Crafter, is the one who helped me go with the current title.


My first e-mail address back in 1993 was ruready1st. My account on Twitter is ruready1st and I have used it on several message boards and forums. I guess that is the best way to explain why this blog is RUReady2Craft.


In the beginning, I accidentally started doing crafts. I actually have another blog for me to be me, An Obsessed Analyst. My first posts came directly from that site. I started this blog to let me focus on my latest obsession, crafts. I may just have to break down and admit I can craft. I may have some latent artistic talent?


I am the mother of two beautiful little girls who deserve the best. They have artistic inclinations. What I see as a mess, they see as creating art. Both girls are strong visual spatial learners. While homeschooling them as a kindergartner and pre-schooler I discovered that arts and crafts were their favorite subject. It was the one activity that they would choose over television and video games.

Now the issue is that I do not really consider myself artistic. I love to shop, talk, spend money, read, research things on the internet, and did I mention shop.


When I moved to Tucson, Arizona I was introduced to the craft of making jewelry with beads. Tucson has the best supply of inexpensive high quality beads during the Tucson Gem, Mineral and Fossil Show. I made my own necklaces and bracelets. I actually quit doing it when we had our first child. I was petrified that I would misplace a bead and she would choke. I gave all my beads away to a family member.


Some necklaces I made over 7 years ago. Left: faux freshwater pearls, Middle: natural Rubies & Swarovski Crystal, and glass beads necklaces.
I never saw the jewelry I made as being into crafts. I thought of it more of an economical choice since I adore jewelry that coordinates with my wardrobe. It was more cost effective to make my own to feed my need. I didn't think my creations were very unique either, just creations that matched my outfits. When I quit I actually had a huge supply of choices and didn't really need anymore. I had run out of jewelry box space.


Then we had two little girls. At first our crafts were fairly simple without much imagination required. There were Moms in Tucson that were incredibly clever making their children clothes, hats, and bows. I admired their talent, but it didn't seem realistic for me to do.


Then I met some Moms in Las Vegas. They were crafters. They had stamps, Cricuts, beads, hand print art, handmade jewelry (not beaded) and projects that were so creative. I saw the fruits of their labor, much of it they did with their children as a part of their homeschool experience. I felt inspired and started doing little things too. I never imagined my girls favorite thing to hear someone say is, "Are you ready to craft?" The real kicker was when my babysitter started doing crafts with the kids with all the supplies I would leave out. When I would ask her where she got the idea, she would say she looked it up on the internet.


The revelation that I could copy other people’s genius from the internet was born. I let the craft monster loose in the house. First the Cricut, then the lunch bag animals, and then bows. Right now I am stuck on bows. I hope to add jewelry too. I may just turn into a master crafter!